Wie kann ich überprüfen, ob mein iOS-Gerät eSIM unterstützt?
eSIM Einrichtung auf iOS-Gerät: Schnelles und einfaches Tutorial
Bevor Sie mit der Installation beginnen, stellen Sie bitte sicher, dass Ihr Gerät über eine stabile Verbindung verfügt, vorzugsweise eine WLAN-Verbindung.
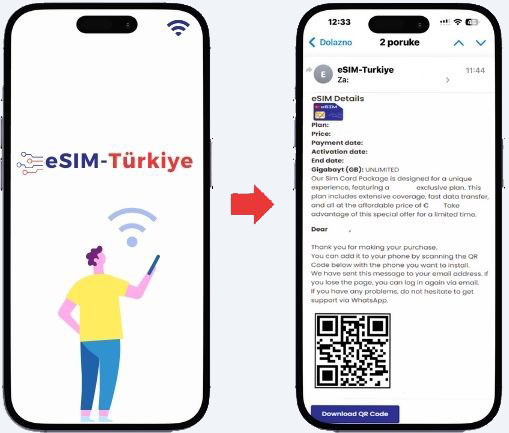
Laden Sie den QR-Code herunter, der an Ihre E-Mail-Adresse gesendet wurde.
* Wenn Sie die E-Mail nicht erhalten haben, wenden Sie sich bitte an unsere WhatsApp-Online-Supportnummer.
* Unsere WhatsApp-Nummer wird im Beschreibungsbereich geteilt.
QR-CODE-METHODE
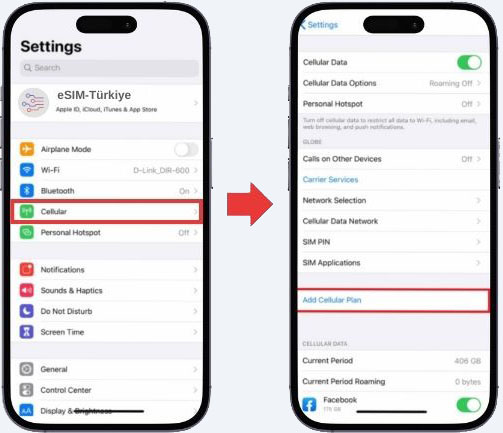
1- Gehen Sie zu den Einstellungen auf Ihrem Gerät.
2- Tippen Sie auf Mobilfunk oder Mobile.
3- Tippen Sie auf „Mobilfunkplan hinzufügen“ oder „Mobile Datenplan hinzufügen“.
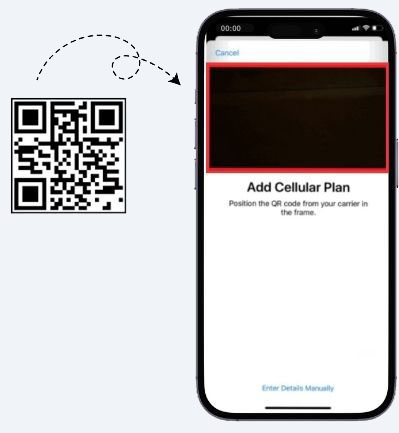
4 - Verwenden Sie Ihren ausgedruckten QR-Code oder ein anderes Gerät, auf dem der QR-Code angezeigt wird, um Ihren eSIM QR-Code zu scannen.
5- Wenn Sie dazu aufgefordert werden, geben Sie den 4-stelligen Bestätigungscode ein. Sie können diesen Schritt überspringen, wenn Ihnen kein Bestätigungscode zur Verfügung gestellt wird.
6- Wählen Sie ein Etikett oder ein benutzerdefiniertes Etikett für Ihre eSIM.
7- Wählen Sie auf der Seite „Standardleitung“ Ihre eSIM nur für mobile Daten aus.
8- Sie sollten Ihre neue eSIM unter „Mobilfunkdaten“ oder „Mobile Datenpläne“ sehen.
DATEN ZUGREIFEN
Nachdem Sie Ihre eSIM installiert haben, nehmen Sie die erforderlichen Anpassungen vor, um die Verbindung gemäß den Anweisungen auf Ihrer eSIM-Installationsseite herzustellen.
1- Gehen Sie auf Ihrem Gerät zu Einstellungen>Mobilfunk oder Einstellungen>Mobile
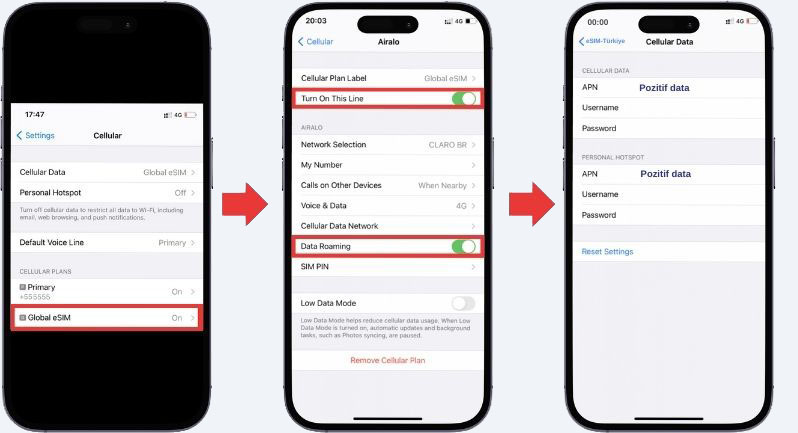
2- Tippen Sie auf Ihren neu installierten eSIM-Plan.
3. Schalten Sie „Diese Leitung einschalten“ für Ihre eSIM ein und aktivieren Sie das Datenroaming.
4- Tippen Sie auf derselben Seite auf MOBILFUNK-DATENNETZWERK ODER MOBIL-DATENNETZWERK. Geben Sie den APN (Zugangspunktname) in das entsprechende Feld auf Ihrem Gerät ein, falls erforderlich. Sie finden die APN-Daten in den eSIM-Installationsdetails auf den eSIM-Türkiye-Webdetails.
5- Gehen Sie zurück zu Einstellungen > Mobilfunk oder Einstellungen > Mobile
6- Wählen Sie Ihre eSIM für Mobilfunkdaten oder mobile Daten aus. Stellen Sie sicher, dass „Datenwechsel für Mobilfunkdaten zulassen“ deaktiviert ist, um Gebühren auf Ihrer anderen Leitung zu vermeiden.
7- Gehen Sie zu den eSIM-Einstellungen und wählen Sie das unterstützte Netzwerk aus. Wenn Sie Fragen haben, können Sie sich gerne an den Support wenden.
Brauchen Sie noch Hilfe?
Kontaktieren Sie uns, und unser Kundenserviceteam wird sich schnell bei Ihnen melden.
Nachricht senden DE
DE  EN
EN
 TR
TR
 RU
RU
 ES
ES
 FR
FR
 7/24-Kundendienst